This is the “how-to” page where you will find all sorts of helpful things about your new website.
Table of Contents
- Pages
- Page Blocks
- Testimonials
- Team Bios
- Media Library
- Programs
- Articles
- Options (social media links, default header images, Resource Center header image)
- Forms (contact page form)
- Redirects
Pages
- In left menu, click ‘Pages’ (This will allow you to view all Pages that are currently built)
- If you want to build a new page, select ‘Add New’
- First, ‘Enter title here’ for the page.
- After the draft is saved or the page is published a URL (Permalink) will be auto-generated based upon what is entered into the ‘Title’ field. To change, click the ‘Edit’ button that appears next to the url (under the Title area). This may be particularly helpful for Program names that have an acronym, so that the url can be short. (/phase vs. /preventing-heart-attacks-and-strokes-everyday)
- Enter content into wysiwyg (instructions below)
- Join page blocks to the page (if desired) by clicking name in the left window of Page Blocks box. Anything on the right will appear on the front end. Click and drag to reorder. Click (-) to remove from page. (See Page Blocks section for details on how to build Page Blocks. These need to be built before joining to a page.)
- Enter SEO information in the Yoast settings at the bottom of the page. (You will need to add a Meta Title/Meta Description.)
Content Editor (WYSIWYG)
- Type content directly into the wysiwyg in HTML Fields Tab or copy/paste from word processor with ease
- When copying/pasting, ALWAYS use the clear formatting button (small eraser icon) and/or paste as plain text (T on clipboard icon).
- Use special characters button (Ω) for all special characters (©, ®, ™). If not, the coding may be different.
Font Styles Selection
- Different font styles, including headers, are chosen from the Format drop-down menu and are labeled “Header 1, Header 2, etc.) Please see the Content Styles page for reference to your site’s font styles
- Highlight the text and then select the desired font style
Block Quotes In Content Editor
- Highlight text to be put into block quotes
- Select block quote button (“) next to the Italics.
Links
- Highlight the word/s which you want to create as a link and clicking on the insert/edit link icon.
- Enter the destination URL directly into the field or start typing in field to search for internal pages.
- For internal links, insert page url only after your domain name. IE: www.website.com/about would be: ( /about).
- For external links, insert the entire url (http://www.website.com) and click Open in a New Window/Tab box within the setting popup window (by clicking on the gear icon).
- For telephone “click to call” functionality add tel:phonenumber, and for email insert: mailto:[email protected]
- To add a button, highlight the link, and in the format menu, formats: select Button
- To break a link, highlight linked text and click Remove Link button (broken chain)
- Click Update
Inline Images
- To add an in-line image, place your cursor on the area where the image should appear, and click Add Media button above wysiwyg
- Click on the little chart symbol to open the media library
- Scroll to find an image or search using field in top right corner, select it, then click Insert Into Page button
- Upload and find the image on your computer (EDIT ALL IMAGES IN IMAGE EDITING SOFTWARE BEFORE UPLOADING TO FILEBIN PLEASE) and upload. Then select the image and click insert.
- Once the image is in place, click on image to reveal edit toolbar. Choose an alignment and add vertical/horizontal space if necessary.
- Click Update
Yoast SEO Settings
- Search Engine Listing Tab (Yoast settings at the bottom of the page editor)
- Enter Title tags (max. 70 characters)
- Enter Meta Description (max. 140 characters)
- Social Networks Listing Tab
- (This is the pre-determined information that you want to include if someone were to Share your page or story. Mostly used in blog posts, or articles.)
- Enter Title
- Enter Description
- Upload Image
- (This is the pre-determined information that you want to include if someone were to Share your page or story. Mostly used in blog posts, or articles.)
Page Attributes
Underneath the publishing tools at the top right is Page Attributes. This is where you assign your page to the site.
- If your page is structured underneath a main navigation section, select the Parent page from the dropdown. Otherwise you can leave (no parent).
- If multiple pages are to appear in the same sub-nav, order the page(s) with a number in the order field.
Adding a Sidebar Widget
This is a ‘three-step’ process. 1. Creating the sidebar widget content. 2. Creating the space on the page for the widget. 3. Joining the widget to that page.
- In the dashboard menu go to Widgets > Add New. (you can view all widgets in Widgets > OMS Widgets)
- Name and add the new content for that specific sidebar. You have options for open content, image, video, map. Choose the correct item, and complete the entry.
- In Appearance > Widget Areas, create (Add New) and label a new widget area and assign it to the relevant page(s) with the check box fields below. This will create a sidebar widget area on the desired pages, like the contact page.
- Once the area is created go to Appearance > Widgets, select the widget area you created from the list on the right (newly created areas will appear at the top).
- Click and drag the OMS Persistent Widget from the options on the left into the “area” on the right.
- Click the drop down on the OMS Persistent Widgets and choose the entry you completed in OMS Widgets.
- If you are adding more than one sidebar element such as text, an image, etc., you only need to create one sidebar widget area.
- You have to drag/drop the OMS Persistent widget into the sidebar multiple times until all of your items have been added. Continue to select the different widget sections from the drop down menu. If you want to reorder them, just drag and drop!
Page Blocks
Page Blocks are created separately from pages, and then joined to the desired page. Because of this, it is easier to create a Page Block prior to creating your new page. If you do create a new page and then need to create a new Page Block, just save a draft of your new page so that you can come back to it after creating your desired Page Blocks.
- In left menu, click Page Blocks (This will allow you to view all Page Blocks that are currently built in the system)
- If you want to build a new Page Block, Select Add New. You can also edit an existing page block.
- You can also clone a page block if you want to create a very similar block for a different page. Be sure to rename the pageblock and change the ‘join’ to the correct page.
- To build a new page block: Enter Title
- Please note that the title is not associated with SEO in page blocks, so you will want to name it intuitively (so that you know how to grab it later when joining to a page). For example, page blocks that are going to be joined to the About page should be named “About – short description of the block”
- Hidden: Select No (recommended) from the drop-down menu
- Select background color from the drop-down menu
- Hide on Mobile option allows you to hide page blocks on mobile devices to increase speed if desired.
- Layout: Select from the available list based on the type of block being created (full-width, two column, or three column) Refer to available designs on page block styles.
Page Block Content Options
- Once you’ve selected your layout, within each column, you need to select the type of content from the drop down menu under ‘Column Content Type’ (image, text, video, slideshow, testimonial, stat)
- Testimonial sections should only be used within full-width page blocks. Testimonial content is managed within the testimonial section (see more below) of WordPress and then joined to the page block.
- Stats can only be used within 2 column and 3 column layouts. They are designed to give a yellow overlay to a background image that should to be loaded on that page block.
- Video page blocks require an image preview. Enter the url of your video and add the image from your media library.
- Three Column page blocks that use and image above the text – When creating this page block the column content should be text, this will allow you to add an image above the text content.
- Images can be rectangular or circular (see style guide for image sizes). To make the circle you must change the ‘Image Style’ field (above Join) from square to circle.
- To create a Call to Action button, highlight the desired text, link it, and in the Format drop down menu select ‘format’ then ‘button’ (same is in the wysiwyg editor info above).
- Reference the style guide for the correct image sizing info.
- Scroll back up and “Publish” your Page Block. Your new Page Block has been created, however, until it is joined to a page, it will not be visible.
- You can join a page block to a page two ways.
- From the page block, under “Join”, you can select the page (or program) to join it to. (Use the search bar or dropdown selection to narrow down the options.)
- From the page, under “Page Blocks”, you can select one or more page blocks to join to this page.
- You can join a page block to a page two ways.
- The order of the page blocks, once selected, will dictate how they will appear on the page. Blocks can be re-ordered as needed.
- Click red Update button to save your changes and Publish.
Your designed page blocks
In addition to the Full width, 2 column, and 3 column basic content page blocks, you have four specifically designed page blocks designated for specific functions.
- Programs Block – This block will mostly be used on the focus area landing page to show the programs within this focus area.
- Scroll down and select layout “Programs Block”
- Optional Header – Do NOT use this field for this page block
- Intro – Enter h2 header and body copy that will appear on the left side of the block
- Background color – select None (grey) or White
- Programs – Select Programs to join to this block. Note: Programs must already be created in the Programs post type area in order to appear in this list.
- Once joined, the programs listed on the right side of this window can be dragged and dropped to rearrange the order they will appear on the page block
- Join – Select the page this block will be joined to. (You can also do this reversely from the Page backend.)
- Program Tables Block – This block will mostly be used on the Program page to show the Key Date and Timeline. The table visual within the wysiwyg can be stretched horizontally and it will not affect the column widths on the page. These have been hard coded. Note: This block can also be used as two columns of text that appear 1/3 – 2/3 in width.
- Scroll down and select layout “Program Tables Block”
- Optional Header – Do NOT use this field for this page block
- Intro – Do NOT use this field for this page block
- Background color – select None (grey) or White
- Left Column – Enter h2 header, any body text, a table with 2-columns any any rows needed, and enter content in each cell. Note: It may be easiest to copy and paste an existing table from a program or the page blocks example page and paste it into this new page block.
- Additional rows can be added by clicking within the table icon in the wysiwyg editor toolbar.
- Right Column – Same as the left column above. More than one table can be added in either column if needed.
- Join – Select the page this block will be joined to. (You can also do this reversely from the Page backend.)
- Program Teams Block – This block will mostly be used on the Program page to show the Teams (organizations, cohorts, etc.) affiliated with this program.
- Scroll down and select layout “Program Teams Block”
- Optional Header – Use this header field to create a styled, centered header above the team visuals.
- Intro – Optional, use this field to add additional content (such as a link to the Program Team Page)
- Background color – select None (grey) or White
- Program Teams – Click on the blue “Add Team Members”
- Add an Image – Team images need to be 300 x 300. Logos can span the entire width or height or be smaller (additional white space is hard coded around the image on the visual)
- Enter Title, Meta (location), and Description fields.
- Join – Select the page this block will be joined to. (You can also do this reversely from the Page backend.)
- Resources Block
- Scroll down and select layout “Resources Block”
- Optional Header – Use this header field to create a styled, centered header above the resource visuals.
- Intro – Optional, use this field to add additional content below the header.
- Background color – select None (grey) or White
- Resources – Select Resource articles to join to this block. Use the Search field or ‘Select taxonomy’ field to filter available options. Note: Resources must already be created in the Articles post type area in order to appear in this list.
- Once joined, the resources listed on the right side of this window can be dragged and dropped to rearrange the order they will appear on the page block.
- Join – Select the page this block will be joined to. (You can also do this reversely from the Page backend.)
Testimonials
- Navigate to the testimonial section on the left menu to add a new testimonial
- The name of the testimonial will appear as the author
- Enter the testimonial content into the WYSIWYG editor
- If applicable, add the author’s byline. (url and email are also available but you likely won’t use these)
- Join the testimonial to a page block on the page block in the testimonial dropdown.
Team Bios
- Add name in the title field and position in the given fields
- Bio Image: Upload their headshot.
- Add their positions
- Author field is optional, but will associate to the articles tagged to that person in the resource center and pull them in to the Bio page as articles written by.
- Under social media, add links and icons to their accounts. Click ‘add Row’ to add an additional social profile
- Add their bio in the primary content area.
Media Library
- Click Media, Library, Add New
- Drop files into window or click Select Files button
- To Edit Images or other Media you may view as a list or Media Grid View
- Inside the Media Grid, media items are displayed in a thumbnail grid for ease of navigation. Click any media item to edit the image directly; however, it’s recommended that you use photo editing software like Photoshop before uploading images to Media Library. In this view, you may also edit the image metadata or media item metadata.
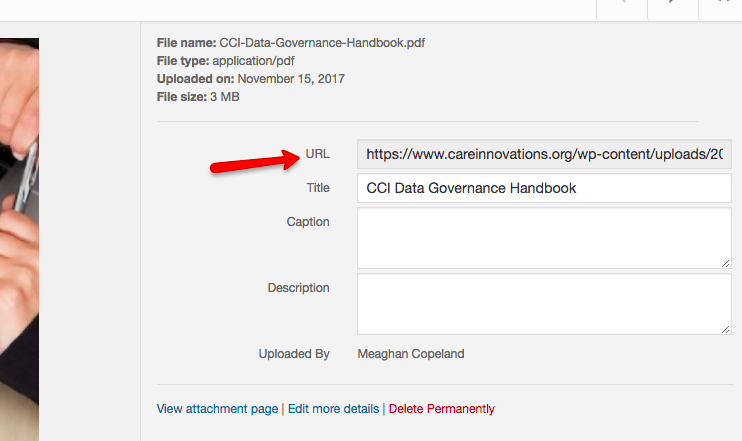
- Linking to a PDF in the media library – Open the media library in a new tab, find and click on the PDF in to see details, copy the url field and paste into the link field on the highlighted text you want to link, open the ‘link options’ (gear icon) and check ‘Open link in a new tab’.
- In order to preserve the URL for a pdf, you simply click on the pdf in the media library and copy the URL. Then you can delete the file from the media library and re-save the new one with the old URL.
- But beware of link rot! Whenever possible, link to web pages rather than PDFs.
- This gives our readers the opportunity to access our content without downloading it. You never know if folks are surfing our website on their phones, tablets, work computers that ban third-party downloads, etc.
- Landing pages are more stable than PDFS, which tend to be renamed and move around on websites.
- PDF file names are more likely to contain characters that are “unsafe” in URLs — commas, spaces, weird characters, etc. This makes them less reliable.
- When PDFs are very large, the download can cause browsers to time out. Also they depend on specific software being installed. Don’t assume people have Adobe Reader or the compatibility!
- In order to preserve the URL for a pdf, you simply click on the pdf in the media library and copy the URL. Then you can delete the file from the media library and re-save the new one with the old URL.
- Library can be filtered by type or date and is searchable by title
Programs
- In left menu, click ‘Programs’ (This will allow you to view all Program pages that are currently built.)
- If you want to build a new Program page, select ‘Add New’
- First, ‘Enter title here‘ for the page.
- After the draft is saved or the page is published a URL (Permalink) will be auto-generated based upon what is entered into the ‘Title’ field. To change, click the ‘Edit’ button that appears next to the url (under the Title area). This may be particularly helpful for Program names that have an acronym, so that the url can be short. (/phase vs. /preventing-heart-attacks-and-strokes-everyday)
- Program Type (in the right column menu areas) – Select the Focus Area this program belong in.
- Featured Image (in the right column menu areas) – Set a feature image. This will pull through to the Programs page block that will be on the Focus Area landing page.
- WYSIWYG – NOTE: “Overview” header is hard coded to the top of this content. Enter main program page content here. (additional page blocks can be created and added below)
- Yoast SEO – Enter SEO information for this program page here. (You will need to add a Meta Title/Meta Description.)
- Additional Page Content
- Title – Enter if you want to over ride the page title for the h1 in the header image area on the page.
- Header Image – Add a new header image if you want to override the default image.
- Subtitle – optional, will appear above the h1 in the header image area on the page
- CTA – optional link to another page (contact, team program page, etc.) Note: Keep in mind that a link out (even internally) up here my prevent some users from engaging with the content on this page.
- Except – This content will pull through to the program page block.
- Additional Program Content – The dates will pull through to the program page block. The About will appear in the right-column sidebar on the Program page.
- Start Date – Calendar will appear. If nothing is selected “Now” will appear on the program page block.
- End Date – Calendar will appear. If nothing is selected “Ongoing” will appear on the program page block.
- About – NOTE: “About this Program” header is hard coded to the top of this content. Enter content to appear on the Program page, right sidebar. (Remember to add stylings in the wysiwyg.)
- Page Blocks – Join any created page blocks specific to this program page by clicking the name in the left window of Page Blocks box. Those on the right will appear on the front end. Click and drag to reorder. Click (-) to remove from page. (See Page Blocks section for details on how to build Page Blocks. These need to be built before joining to a page.)
Program Team Page
These pages are basic pages that are not accessible in the Primary/Footer navigations. The only access to these pages is via the site search, or a link on the Programs pages in the page block for Teams.
There are specific steps needed to make these pages appear with the Overview (main page) in the subnav.
- Create a new page named “Program Team Huddle”. Make sure it is assigned with “(no parent)” in the right column under Page Attributes.
- Add all overview content and page blocks here.
- Create additional subpages (other than overview) and add parent page as the “Program Team Huddle”
- In the Dashboard go to Appearance > Menus, and load the “Program Team Pages” menu
- Add the new “Program Team Page” to this menu (this will appear at the bottom of the list).
- Add this page AGAIN and make it a subpage of the first,
- Open this subpage tab and rename this page to “Overview”, under “Navigation Label”
- Add additional subpages if needed.
- Save Menu
Articles
- In left menu, click ‘Articles’ (This will allow you to view all Articles that are currently built.)
- If you want to create a new Article, select ‘Add New’
- First, ‘Enter title here‘ for the page.
- After the draft is saved or the page is published a URL (Permalink) will be auto-generated based upon what is entered into the ‘Title’ field. To change, click the ‘Edit’ button that appears next to the url (under the Title area). This may be particularly helpful for Article names that are particularly long, so that the url can be short if need be.
- Article Type (in the right column menu areas) – Select either ‘Knowledge Share’ or ‘Perspectives’.
- Article Author (in the right column menu areas) – Select Author or ‘Add New Author’ below. (Authors that have Team Bios will allow the three most recent Articles to pull through to the Bio page, if also set there.)
- Focus Area (in the right column menu areas) – Select one of the six Focus Areas to attribute this article to.
- Featured Image (in the right column menu areas) – Add image to replace the default header image.
- WYSIWYG – Enter main program page content here. (additional page blocks can be created and added below)
- Yoast SEO – Enter SEO information for this program page here. (You will need to add a Meta Title/Meta Description.)
- Additional Article Content
- Download – A downloadable file can be added here which will appear link a button within the article.
- Program – Selected Program will pull through to the header area under the Header.
- Related Resources – Selected resources will appear at the bottom of the article under a header ‘Related Resources’
- Hide CTA – Check this box if you DO NOT want the hard coded ‘Find this useful or interesting?’ subscription CTA.
- Page Blocks – Join any created page blocks specific to this article by clicking the name in the left window of Page Blocks box. Those on the right will appear on the front end. Click and drag to reorder. Click (-) to remove from page. (See Page Blocks section for details on how to build Page Blocks. These need to be built before joining to a page.)
- Page blocks will appear below the Subscription CTA.
- Except – This content will pull through to the Resource Center page and the Resouces page block.
Options
- The Options section is where you can edit the Social Media links in the footer.
- You can also edit or change the default header images we’ve set for pages, articles, bios, and programs. Changing this will NOT override headers that have been manually added in these pages/posts.
Forms
- To edit the existing contact page form “Send Us a Message”
- Select Send Us a Message form
- Click on the gear icon of the field you want to edit. For example, ‘Topic’.
- Edit the Label to change the name of this field, edit or add Options below to change the selections available within the dropdown.
- Each field in the form has a ‘Required Field’ toggle switch under the Label.
- To create a new Form, select Forms from the left navigation.
- Select Add New Form
- You can either click “Add form fields” to build a form from scratch, or you can ‘Start from a template’.
- On the right side of the screen are all of the form fields that are available to you. If you are not seeing the form fields, click the blue + button to reveal them.
- Click a form field to have it appear on the left side of the screen. Clicking on the form field will open up a window on the right where you can customize the “Label” of the field and/or make a field required.
- “Email & Actions” tab
- Edit redirect, email admin and email user settings for each form. To view all of your options, click the blue + button.
- Redirect – redirects to thank you page (You must build a Thank You page in the Pages section, and then add the URL to this action. We recommend this for tracking goals in Analytics.)
- Email admin –You can customize the way each submission hits your inbox: from name, address, to email (very important), subject, and fields.
- The Advanced Settings below the html window allow for additional email parameters to be added. If an auto Reply email, CC or additional email addresses need to be added to the form. Can be done here versus creating new email addresses.
- Once the form is complete, publish your form. Then copy the short code for your form and paste into your wysiwyg on the page that you want to add it to. (ie: Contact, Application, etc.)
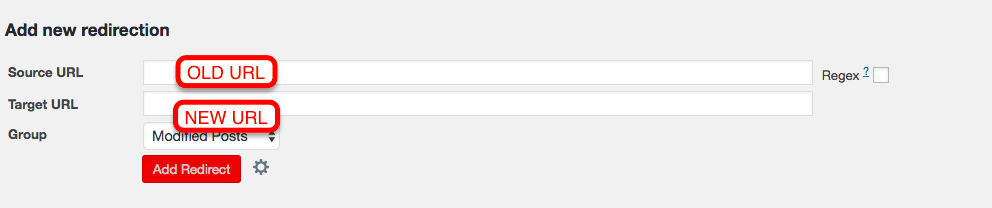
Redirects
-
- Go to Tools > Redirection
- Scroll to bottom of page
- Add the Source redirect in the field (old URL)
- Add the Target URL in the field (New URL)
- Click Add Redirect button