Mapping your workflow is key to successfully piloting new technology in healthcare. Let’s dive deeper into how to map your workflows and what the critical benefits are to doing so.
Mapping workflows is visually documenting how specific activities are accomplished in your organization. There are two aspects: 1) Identifying activities and 2) visually documenting them.
Let’s start with identifying specific activities. While there may be some activities that are unambiguous, perhaps because they are proscribed by policy or regulation, most workflows in an organization are a little fuzzier—and a lot more complicated. They involve multiple people, a chain of interactions, objects, data and reference systems. For example, new patient intake at a hospital, emergency room triage, or even a routine primary care visit.
Can you think of a few activities that come to mind in your own practice? Are you looking at a new technology to introduce into your care experience? If so, the activities that will be affected by the new technology should be mapped!
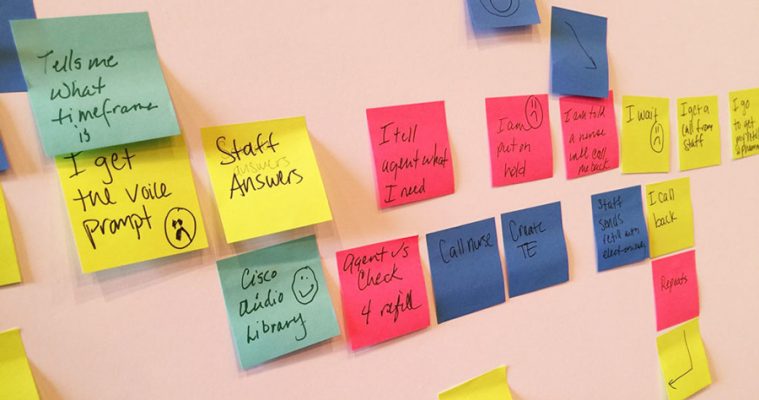
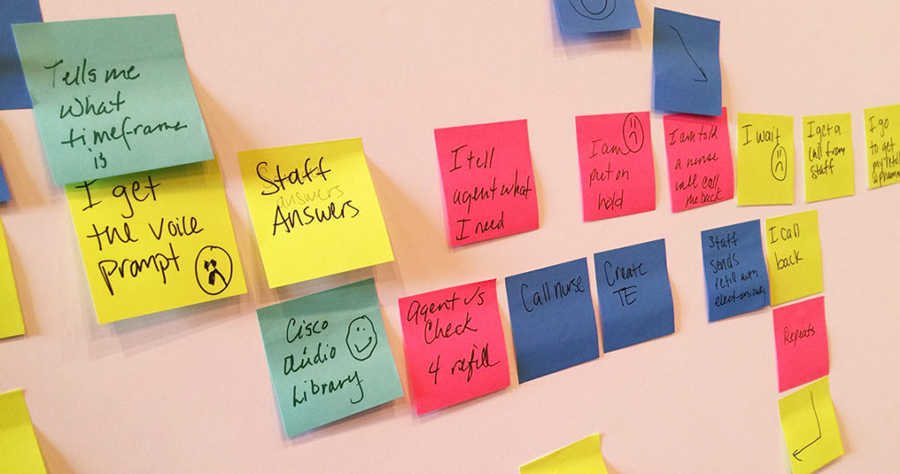
Once you’ve identified your activity, it is time to start visualizing it. A great way to start is with individual sticky notes, a Sharpie marker and a pad of easel paper. You’ll need two or three sheets to give yourself enough room to work it out.

Have the people who are part of the workflow help you. Ask them to Show and Tell you what they do in the workflow. Write down singular activities, one per sticky note. What happens first? Can you show me? Then what happens? Great, show me that. Paste each sticky note task in sequence on the easel page.
Try to move through the whole overall activity once without much editing or fretting! You may have some branching, some clarifying what happens at a specific point, and other questions you can’t anticipate before starting. That’s okay. You’re just trying to document the bare facts of the workflow before looking at it more inquisitively.
After going through this process once, step back and look at the steps a little. Do they feel right? Are they all laid out at the same level of detail? Does it capture the overall flow pretty well? Make adjustments. It doesn’t have to be perfect! The 30 minutes of work you’ve done already will be helpful!
Once you have the overall structure, its time to use the map as a “palette for analysis” — a base onto which we layer additional levels of information.
So, take a different color set of sticky notes. Use this color to document another dimension of this workflow. What are “dimensions?” One could be “pain points” — where things go wrong. Another could be the people involved in each step. Another could be each point of data entry or data access. Or wait time.
Use a different color for each type of information. Choose dimensions you want insight into!
After 30 to 45 minutes or so, you will have a useful representation of the workflow and a set of layers that provide helpful context.
Why do this? What are the benefits of mapping your workflow?
First, the act of mapping the workflow is a useful way to engage your colleagues or staff in improving care. Often we take for granted what everyone does on our team, or we have skewed ideas in our minds of what other people do. Working together to map these visually almost always uncovers surprises that can then be used to smooth out some of these rough spots.
Second, you now have a tangible representation that invites ongoing engagement beyond a single meeting. Kept visible on a wall, the workflow invites reflection and discussion. Could we simplify this? What are we not accounting for? In this way the map provides a catalyst for future discussions you haven’t anticipated.
You can also use the map to interview patients or other stakeholders. As you begin to engage patients to understand their experience of your services, have them place sticky notes or stickers at points on the map where they experience frustration, fear or satisfaction. Because their viewpoint is very different than your own they can often help you ask questions that you originally missed.
Finally, a workflow map provides a basis for discussing new technology solutions. Technology is seductive, especially sales demos of solutions that aren’t really running within your organization. Now whenever a vendor pitches their solution, you can walk through your workflow with them, and you can map their solution in another color onto your workflow.
This helps avoid one of the biggest reasons new solutions are hard to implement and adopt — not assessing the impact on workflow!
In summary, mapping your workflows is a powerful and beneficial activity for your team and organization. The exercise brings clarity to complex and differently understood processes.
A great way to get started is to engage staff at your next standing meeting. Pick a workflow that everyone would benefit from examining. Take 30 to 45 minutes to create your first workflow map.
Then use it to engage everyone in new and productive ways on your road to improving care experiences for all!